Learn how to make ghost SVG files in Illustrator, perfect for Halloween crafts & cut files.
In this video, I’ll show how to draw ghost SVG files for Cricut and other cutting machines from scratch. Learn how to make your own SVG files for different materials like vinyl, HTV and cardstock!
If you want to follow along, I’ve included a link below where you can download this Illustrator practice file, which includes the color palette I used, the finished ghost SVGs, and a few of the working stages along the way.
Video Tutorial: How to Make SVG Files: Ghost
If you prefer written step by step instructions for how to make ghost SVG Files for Cricut in Illustrator instead of video, continue reading.
Download & Follow Along
Free Illustrator Practice File – CFC012:
To follow along and learn how to make ghost SVG files for Cricut download the free Adobe Illustrator practice file for this tutorial.
Includes the finished designs, color palette, and working stages shown in this video.
Grab it from my Free Design Library: File # CFC012.
Want access to this free file? Join my FREE Design Library! All you need is the password, which you can get by filling out the form below!
Free Design Library!
Subscribe to my free newsletter and get instant access to my FREE Design Library, which includes this file and all other design tutorial files!
Enter your email and check your inbox for the password!
Written Overview: How to Make Ghost SVG Files for Cricut
Draw Ghost Body:
- Use the Rectangle tool (M) to draw a vertical rectangle with a white fill and black stroke.
- Increase the stroke weight to be thicker for the ghost outline – I used 10pt stroke weight.
- Using the Direct Selection tool, select the top 2 anchor points of the rectangle to view the Corner Widgets. Click the top 2 corner widgets and drag inward to until red highlight appears to give the rectangle a completely rounded top.
- Use the Direct Selection tool to select the bottom 2 anchor points, right-click and choose “Transform > Scale”. In the Scale Options window, choose “Non-Uniform” and increase the Horizontal size as desired (I used 115%). Click OK.
- Use Direct Selection tool to select bottom path of rectangle ONLY. Click CMMD X or CTRL X to Cut the bottom path from the rectangle. Then click CMMD F or CTRL F to paste it in front.
- Use Direct Selection tool to select side anchor points of rectangle and click “Convert to Smooth Anchor Points” icon in Control bar at top of screen to add some curve to the sides of the ghost body.
- Use Direct Selection tool to adjust side path curve handles as needed to create desired “flared bell” shape for ghost body.
Add Wavy Bottom:
- Select the bottom path (which is now separated from the rectangle shape), then choose EFFECT > DISTORT & TRANSFORM > ZIG ZAG.
- In Zig Zag window, change Points to “Smooth”. Adjust Ridges per segments as desired, using an ODD number (I used 5). Adjust Size as desired to increase or decrease the height of the waves (I used 0.08in). Click OK to apply your changes.
- Move bottom path to make sure side end points meet up with bottom paths of rectangle (ghost body) as needed.
- Select bottom path and remove white fill color by clicking the “None” box in the Swatches Panel or bottom of Toolbar.
- (Optional) To add some curve to the bottom path, press Shift C to grab the Anchor Point tool, then click and drag down slightly on the wavy path.
- Convert wavy effect to a path by selecting the wavy path and choose “OBJECT > EXPAND APPEARANCE. (Be sure to make a copy of the wavy path to the side of canvas for future editing first).
- Connect endpoints of wavy path to ghost body by selecting end points and using the Join tool to join points together.
Draw Ghost Face:
- Press L to grab the Ellipse tool and click and drag to draw an oval for the ghost eye. Give a black fill with no stroke.
- Create a copy for the other eye.
- Draw a small oval, circle, or semi-circle to create a mouth and center beneath the eyes.
- Select Face shape and group together.
Create SVG Cut Files with Different Layering Options:
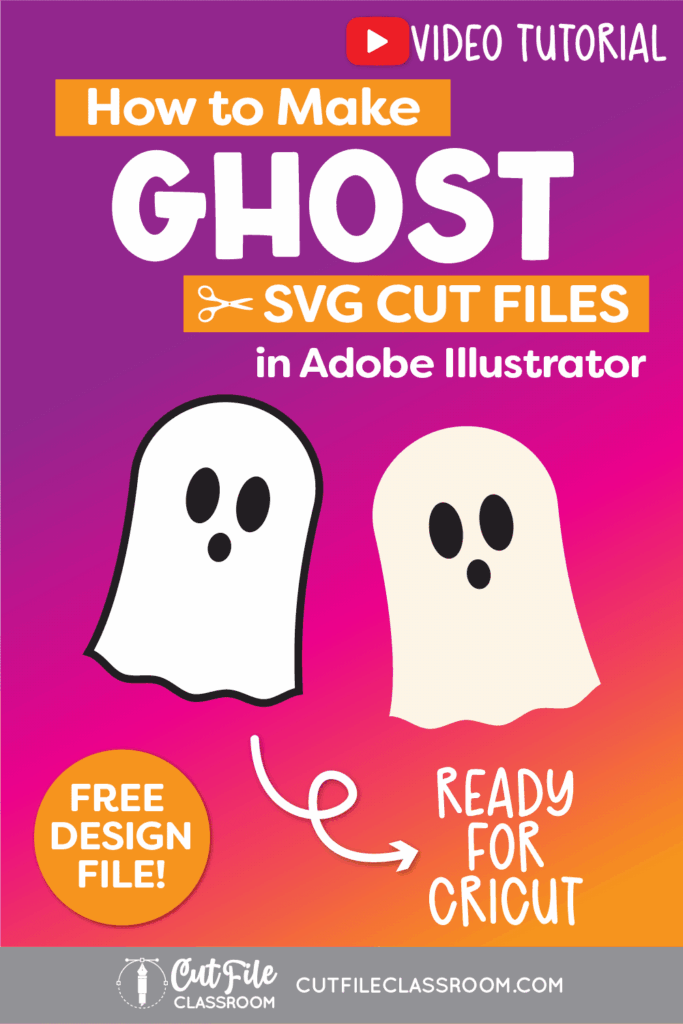
Option 1: Ghost with Black Outline:
- First, make a copy of original ghost design over to side of Canvas for future editing.
- Select Ghost body only (not face) and choose OBJECT > PATH > OUTLINE STROKE. This converts the outline from a path to a shape.
- Select white fill color (which is now a separate vector shape from the outline shape), and delete it.
- Using the Group Selection tool, click to select ONLY the inner path of the outline shape. Then press CMMD X or CTRL X to cut the shape, leaving a solid black silhouette shape.
- Then press CMMD F or CTRL F to paste the shape in Front, and give it a white fill.
- Select Ghost face shapes, then select cream colored ghost shape, and click “Subtract” in Pathfinder panel. This will “punch out” the face shapes from the white ghost body, so the black base can show through.
Option 2: Ghost with No Outline:
- Make a copy of original ghost design onto the artboard to create this version.
- Select ghost body and remove stroke color from ghost shape, leaving only the white fill.
- Change the white fill to cream (or any other color as desired to allow the ghost to stand out against a white artboard.
- Select face shapes and make a compound path by pressing CMMD 8 or CTRL 8.
Now you have 2 ghost SVG files that are ready to cut in Cricut Design Space and other cutting programs. Download my Free Designer’s Guide to Error-Free SVGs to see my recommended settings for Saving SVG files.
Give this a try and come share your finished ghost designs (and any questions) in my free Facebook Group!
If you found this SVG design tutorial helpful, Pin the image below to come back later, and to help other SVG designers learn how to make ghost SVG files in Illustrator for Cricut and other cutting machines!